Animation Transfer Tool
Begin by selecting the file which has the animation you wish to transfer FROM.
This can be a simple skeleton file, an FBX or even another rig.
Next, import the destination rig where you want the animation transfer onto.

Once both have been imported the lower section of the tool will open up and allow you to change the mapping. This is a list of nodes dictating what is transferred from and what to.

The Source Root and Destination Root are the parent nodes which hold a joint hierarchy or a list of controls.
The tool will try and make a guess as to where the root joints/controls are. You can change either of these if they are incorrect and the mapping list below will update with the new hierarchy.
You can also go through and input these manually too
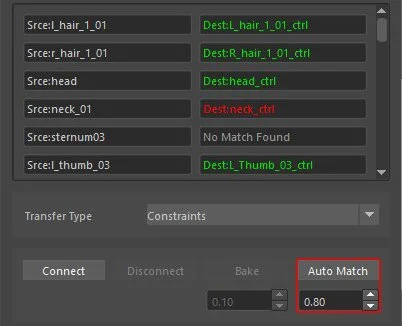
As you can imagine, going through a long list of joints and controls and matching them manually can be a time consuming tasks, so the tool has an Auto Match function that will attempt to match them for you.
Beneath this is a spin box which controls how closely it should examine each name. A higher number will produce fewer errors but also fewer results.
When done, the items in green should be a direct match. Ones in amber are more of a guess so you should check them and any in red definitely need double checking.

Once you are happy with the mapping I would recommend saving it, just in case you need to reload the files.
When the mapping is set, and saved, you next need to connect the source animation (skeleton or rig) to the destination rig.
There are two Transfer Types.
Anim Curves will attempt to maintain the same animation curves used on the the source rig, meaning you get the same keyframes.
Constraints will connect the source and destination using, you guessed it, constraints. This will give a better result on different rigs/skeletons plus you will have the option to adjust the animation before you bake it.
To connect the rigs you choose the options you want and simply click Connect.
Both the source and destination skeletons/rigs will now be directly connected to each other, which you will see if you scrub through the animation.
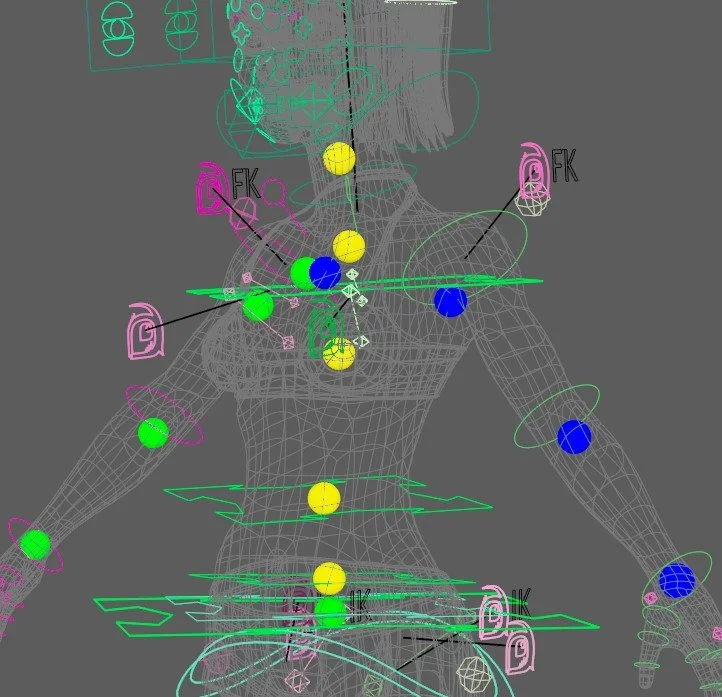
If you chose the Constraints options you will note a series of coloured balls are now attached to the source skeleton.
You can use the attributes found on these to tweak the animation so it better fits your destination rig.
These attribute are also found on the rig controls too, to make things easier.
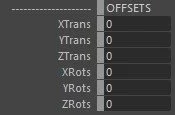
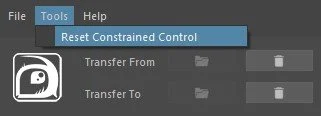
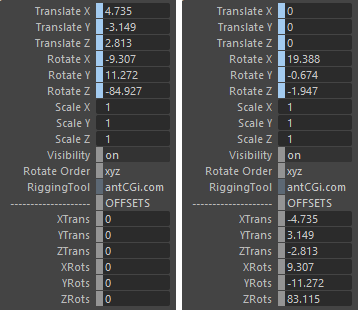
When connected using constraints, it can be useful to reset parts of the rig to help reposition them.
You can do this using the Reset Constrained Control option.
This will move the attributes from the constraint (in blue) down to the offsets, correcting the position for you.
This works best if you select and edit controls which are in a hierarchy in order.
If using the Anim Curve option the curve editing tools will become enabled.

You can use these to quickly remap the animation curves if your skeletons/rigs use different orientations. You cna also set the “To” option to a minus figure to invert the animation too so settings of TX To -X will flip the X translation animation.
Scale Curves will simply scale the animation, which can be used between characters of differing sizes, or if you want to exaggerate or reduce a certain movement.

Once you are happy to proceed, click the Bake button to apply the animation to the new rig. This will also automatically remove the source file for you.
If transfering using Constraints, the value beneath the button will dicate how the animation curves will be optimised. A value of 0 will produce a key on each frame and ignore the optimisation.
Alternatively, if you need to make adjustments to the mapping or transfer type, you can Disconnect the skeleton/rig.